**UPDATE: 11-7-2017 — script updated to include the Microsoft Teams PowerShell module**
**UPDATE: 7-24-2018 — script updated to connect to Exchange Online PowerShell successfully**
**UPDATE: 5-19-2021 — script updated to remove Skype for Business Online module since it is being deprecated and replaced with the Teams module**
Do you ever find yourself wanting an easier way to connect to different Office 365 tenants via PowerShell? If so, I understand the pain of sifting through documentation to find tenant names, admin accounts, and the corresponding passwords. Instead of dealing with a username/password prompt all the time, I have created a PowerShell script that allows you to select previously saved credentials to quickly connect PowerShell to an O365 tenant.
First Step – Storing Credentials Securely
First start off by creating and securely storing an O365 Tenant credential by leveraging the Export-CliXml cmdlet; which encrypts credential objects into an XML file by using the Windows Data Protection API. The encrypted XML credential file is created by a combination of your user account and the local computer account. In short, you CANNOT share the XML file with other users or copy to use on other computers.
More info can be found on MSDN.
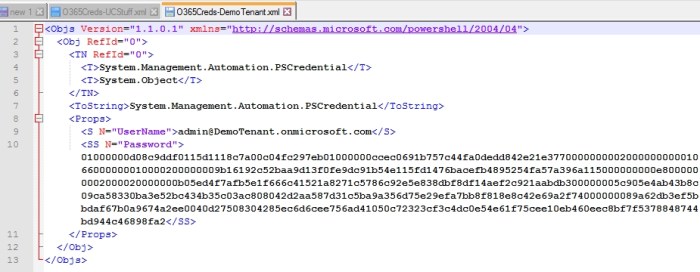
Here is an example of creating an XML credential file where ‘Admin@DemoTenant.onmicrosoft.com’ is the administrative username and ‘C:\Scripts\creds\O365Creds-DemoTenant.xml’ is the desired destination path and name.
Get-Credential "admin@DemoTenant.onmicrosoft.com" | Export-Clixml c:\Scripts\creds\O365Creds-DemoTenant.xmlYou will be prompted to enter a password. When you are done, you can see that the XML file is created. As you can see from the screenshot below, the password is unrecognizable.
You will need to repeat this step with the rest of the unique O365 tenant credentials you want to store.
Second Step – Script to Prompt Which Credential to Use
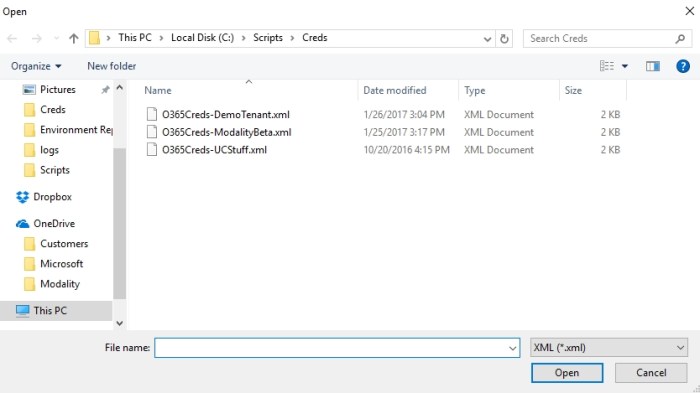
This step is really the fun part of it. This script will bring up Windows Explorer and will allow you to pick an XML credential file to use to connect to O365.
Once you have selected the appropriate XML file, the script will continue to import the credentials and automatically establish PowerShell connectivity to the corresponding O365 Tenant.
The following O365 PowerShell modules are included in the script:
- Azure Active Directory (MsolService)
- Teams
- Exchange Online
So make sure your have the proper PowerShell modules and Microsoft Online Services Sign-in Assistant installed. If there are modules that you want to include or exclude, it should be pretty straight forward to add or remove them in the script.
############################################################################## # # Created By: Nick Elniff # Date Modified: 5/19/2021 # Version: 1.3 # Blog: http://TeamsStuff.net # Twitter: http://twitter.com/nickelniff # PowerShell Modules: Azure Active Directory, Teams, Exchange Online # # DISCLAIMER: You are running this script at your own risk. This script is provided as-is - no #warranty of any kind is provided or implied. # ############################################################################## ####--------First Step---------#### #You will need to create an encrypted XML file for each necessary credential. The following line is an example #Get-Credential "admin@DemoTenant.onmicrosoft.com" | Export-Clixml c:\Scripts\creds\O365Creds-DemoTenant.xml ####-----Set the path for the location that you stored your encrypted XML credential files------#### $CredPath = "C:\Scripts\Creds" #Create Funtion to open Explorer and select file Function Get-FileName($InitialDirectory) { [System.Reflection.Assembly]::LoadWithPartialName("System.windows.forms") | Out-Null $OpenFileDialog = New-Object System.Windows.Forms.OpenFileDialog $OpenFileDialog.initialDirectory = $InitialDirectory $OpenFileDialog.filter = "XML (*.xml)| *.xml" ##--------------Filtered to only show XML files-------------## $OpenFileDialog.ShowDialog() | Out-Null $OpenFileDialog.filename } $CredFile = Get-FileName $CredPath $CredData = get-content $CredFile $Creds = Import-Clixml $CredFile Import-Module MicrosoftTeams # Microsoft Teams connection Connect-MicrosoftTeams -Credential $Creds -verbose # Exchange Online PowerShell Session $SessionEXO = New-PSSession -ConfigurationName Microsoft.Exchange -ConnectionUri https://outlook.office365.com/powershell-liveid/?PSVersion=4.0 -Credential $Creds -Authentication Basic -AllowRedirection Import-PSSession $SessionEXO # Microsoft Online Service connection Connect-MsolService -Credential $Creds #----SUGGESTION---- when you are done with your PowerShell session use the following lines to clear out any credential variables and properly end any active sessions----# #Get-PSSession | Remove-PSSession #remove-variable creds,credpath,creddata,credfile,sessionEXOThe main part you want to customize is which path you want Windows Explorer to open by default. Which can be done by modifying the path for the variable $CredPath = “DesiredPath“.
IMPORTANT NOTES
- This script was designed to work with @.onmicrosoft.com accounts. It was not created to work in situations that require the -OverrideAdminDomain option. (You Skype for Business Hybrid guys know what I am talking about!)
- The script will throw an error if you are trying to connect to one of the Office 365 services that you have no licenses for. The script will continue to run properly without connecting to that specific service.
- The last two lines are comments about clearing variables and ending active sessions – which I always recommend when you are finished with your PowerShell activities.
- Also, note this is meant to run from an open active PowerShell instance – either the regular PowerShell or PowerShell ISE console.
- Feel free to submit any suggestions or recommendations on the script as I am NOT a self-proclaimed PowerShell guru.
